I like to blog about current software design and development projects, as well as general everyday news and events. I'm passionate
about what I do and you can follow my personal journey through my blog. I'm constantly on the lookout for new development techniques
and technologies to keep on top of the changing market, so if I do miss anything feel free to leave me a comment.
Posts Tagged ‘Visual Studio’
Wednesday, February 3rd, 2010
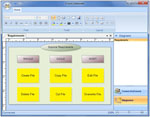
 CrossCollaborate is a software solution that I developed in 2009 as a major project which was part of my Thesis, collectively known as CAPSTONE at the University of Technology, Sydney. CrossCollaborate is a network based diagramming tool which allows users to interact in real-time and work on one or multiple diagrams simultaneously. It is an easy to use application which supports single user mode that can be run without the server. The purpose of the application is to allow users to interact in real-time regardless of their physical location and share information.
Some features which have been implemented include cut/copy/paste, undo/redo, drag/drop, freely move and re-size objects on the surface, zoom-in/zoom-out and print/print preview.  See the poster for more information.
The solution is entirely written in C# using an Object-Oriented approach. It is Event-Driven and is based on the Model-View-Controller and Client-Server architecture.
Tags: .Net, C#, Collaboration, CrossCollaborate, Visual Studio
Posted in .Net | No Comments »
Sunday, May 3rd, 2009
TPG bitometer (aka TPG usage meter) is an internet usage meter which allows customers of TPG Internet to check, monitor and keep a history of their quota usage based on data provided by TPG. TPGbitometer can also be used to check the TPG e-mail inbox.
It is available for download, free of charge.
TPG bitometer includes the following features:
- Compatible with 32bit and 64bit Windows.
- No installation, single file download, nothing written to the registry.
- Support for multiple TPG accounts.
- Display basic information about the plan user signed up to.
- Display number of days remaining until quota resets.
- Display remaining peak/off-peak quota as a percentage and in megabytes.
- Display used peak/off-peak quota as a percentage and in megabytes.
- Display and keep a history of download usage in days, months and years.
- Display remaining daily peak/off-peak quota for the current month.
- Display the current service status reported by TPG.
- Display remaining days, peak and off-peak usage in the system tray.
- Ability to check if there is any email in the TPG inbox.
- Ability to delete emails.
- Ability to view email messages within the program.
- Ability to run the program at start-up and delay the usage update.
- Ability to check for program updates.
- Change colour of the system tray icon.


(more…)
Tags: bitometer, C#, TPG, TPG usage meter, usage meter, Visual Studio
Posted in .Net | 93 Comments »
Sunday, March 8th, 2009
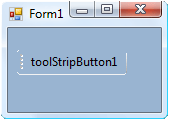
 If you have ever used the ToolStrip control and changed its background colour, you will have noticed that it has a white border around it as show in the picture. This problem can be overcome with a simple override.
Create a new file ToolStripOverride.cs and copy the following code.
1
2
3
4
5
6
7
8
9
10
11
| using System.Windows.Forms;
namespace OverrideControls
{
public class ToolStripOverride : ToolStripProfessionalRenderer
{
public ToolStripOverride() { }
protected override void OnRenderToolStripBorder(ToolStripRenderEventArgs e) { }
}
} |
using System.Windows.Forms;

namespace OverrideControls
{
    public class ToolStripOverride : ToolStripProfessionalRenderer
    {
        public ToolStripOverride() { }

        protected override void OnRenderToolStripBorder(ToolStripRenderEventArgs e) { }
    }
}
Then inside the class where you have your ToolStrip control add the following line to the constructor.
1
| myToolStripControl.Renderer = new ToolStripOverride(); |
myToolStripControl.Renderer = new ToolStripOverride();
Tags: .Net, C#, Controls, ToolStrip, Visual Studio
Posted in .Net | 5 Comments »
Sunday, December 14th, 2008
If you have a PayPal account and would like to add a donate button to your application you can use the following code.
1
2
3
4
5
6
7
8
9
10
11
12
13
14
15
16
17
18
19
| private void btnDonate_Click(object sender, System.EventArgs e)
{
string url = "";
string business = "my@paypalemail.com"; // your paypal email
string description = "Donation"; // '%20' represents a space. remember HTML!
string country = "AU"; // AU, US, etc.
string currency = "AUD"; // AUD, USD, etc.
url += "https://www.paypal.com/cgi-bin/webscr" +
"?cmd=" + "_donations" +
"&business=" + business +
"&lc=" + country +
"&item_name=" + description +
"¤cy_code=" + currency +
"&bn=" + "PP%2dDonationsBF";
System.Diagnostics.Process.Start(url);
} |
private void btnDonate_Click(object sender, System.EventArgs e)
{
string url = "";
string business = "my@paypalemail.com"; // your paypal email
string description = "Donation"; // '%20' represents a space. remember HTML!
string country = "AU"; // AU, US, etc.
string currency = "AUD"; // AUD, USD, etc.
url += "https://www.paypal.com/cgi-bin/webscr" +
"?cmd=" + "_donations" +
"&business=" + business +
"&lc=" + country +
"&item_name=" + description +
"¤cy_code=" + currency +
"&bn=" + "PP%2dDonationsBF";
System.Diagnostics.Process.Start(url);
}
Tags: .Net, C#, Donate, PayPal, Visual Studio
Posted in .Net | 8 Comments »
Monday, December 8th, 2008
Have you ever found yourself developing a custom user interface and needed rounded corners which work on different Windows Operating Systems?
If you are using Windows Vista this is easily achieved by using a rounded PNG image with transparent corners and setting the transparency property. This however does not work on systems such as Windows XP.
The following C# code can be used to ensure you have rounded corners on a number of Windows Operating Systems.
1
2
3
4
5
6
7
8
9
10
11
12
13
| [DllImport("Gdi32.dll", EntryPoint = "CreateRoundRectRgn")]
private static extern IntPtr CreateRoundRectRgn
(
int nLeftRect, // x-coordinate of upper-left corner
int nTopRect, // y-coordinate of upper-left corner
int nRightRect, // x-coordinate of lower-right corner
int nBottomRect, // y-coordinate of lower-right corner
int nWidthEllipse, // height of ellipse
int nHeightEllipse // width of ellipse
);
// Set your own values
Region = System.Drawing.Region.FromHrgn(CreateRoundRectRgn(1, 1, 10, 10 16, 16)); |
[DllImport("Gdi32.dll", EntryPoint = "CreateRoundRectRgn")]
private static extern IntPtr CreateRoundRectRgn
(
    int nLeftRect,      // x-coordinate of upper-left corner
    int nTopRect,       // y-coordinate of upper-left corner
    int nRightRect,     // x-coordinate of lower-right corner
    int nBottomRect,    // y-coordinate of lower-right corner
    int nWidthEllipse,  // height of ellipse
    int nHeightEllipse  // width of ellipse
);

// Set your own values
Region = System.Drawing.Region.FromHrgn(CreateRoundRectRgn(1, 1, 10, 10 16, 16));
Tags: .Net, C#, Rounded corners, Visual Studio
Posted in .Net | 2 Comments »
Friday, October 10th, 2008
Have you ever found yourself working on a Visual Studio solution consisting of multiple projects and wanting to build only the start-up project using a shortcut key?
Unfortunately for some bizarre reason Visual Studio 2005 and 2008 do not have this feature by default. However, there is a simple solution to this. Create a macro and assign it a shortcut key.
First create a new macro module though Tools > Macros with the following code
1
2
3
4
5
6
7
8
9
10
| Imports System
Imports EnvDTE
Imports EnvDTE80
Imports System.Diagnostics
Public Module BuildStartup
Sub BuildStartup()
DTE.Solution.SolutionBuild.BuildProject(DTE.Solution.SolutionBuild.ActiveConfiguration.Name, DTE.Solution.SolutionBuild.StartupProjects(0), False)
End Sub
End Module |
Imports System
Imports EnvDTE
Imports EnvDTE80
Imports System.Diagnostics

Public Module BuildStartup
    Sub BuildStartup()
        DTE.Solution.SolutionBuild.BuildProject(DTE.Solution.SolutionBuild.ActiveConfiguration.Name, DTE.Solution.SolutionBuild.StartupProjects(0), False)
    End Sub
End Module
Now that you have the macro, you simply assign it a shortcut key through Tools > Options. Look for “Keyboard” under “Environment”. Find your macro in the command list and assign it a shortcut key.
Enjoy.
Tags: Macros, Visual Studio
Posted in .Net | 1 Comment »
 CrossCollaborate is a software solution that I developed in 2009 as a major project which was part of my Thesis, collectively known as CAPSTONE at the University of Technology, Sydney. CrossCollaborate is a network based diagramming tool which allows users to interact in real-time and work on one or multiple diagrams simultaneously. It is an easy to use application which supports single user mode that can be run without the server. The purpose of the application is to allow users to interact in real-time regardless of their physical location and share information.
 See the poster for more information.


 If you have ever used the ToolStrip control and changed its background colour, you will have noticed that it has a white border around it as show in the picture. This problem can be overcome with a simple override.